Explore practical perspectives on software delivery, team collaboration, and technology partnerships that help growing businesses make better decisions and build with confidence.
Using this guide master the combination of Flask with SQLAlchemy and Marshmallow to build and manage scalable web applications with ease. In the article we will build a simple REST API using Flask SQLAlchemy and Marshmallow. We will be building a note taking application where these two API endpoints /note/ and/note// will be available. We will be able to create new note or get all the notes by doing a POST or a GET request to /note/ api endpoint. Not only that we will be able to get the details of the note or update the note or delete the note with a GET or a PATCH or a DELETE request to /note// api endpoint. First of all, we will give a brief descriptions of the libraries that we will be using in this article. Flask is a lightweight WSGI web application framework in Python. It is designed to make getting started very quickly and very easily. marshmallow is an ORM/ODM/framework-agnostic library for converting complex datatypes, such as objects, to and from native Python datatypes. Flask-Marshmallow is a thin integration layer for Flask and marshmallow that adds additional features to marshmallow. SQLAlchemy is the Python SQL toolkit and Object Relational Mapper that gives application developers the full power and flexibility of SQL. Flask-SQLAlchemy is an extension for Flask that adds support for SQLAlchemy to your application. It aims to simplify using SQLAlchemy with Flask. marshmallow-sqlalchemy An SQLAlchemy integration with the marshmallow (de)serialization library. We will be using pipenv as our dependency manager. We are assuming that pipenv is already installed in your system. Follow the steps bellow and at the end you will have a simple note application running on http://localhost:5000/. Step 1: Setup Project Environment Copy pipenv --three pipenv --three Step 2: Install Flask and Other Dependencies Run the following commands to install all the dependencies including Flask. pipenv install flaskpipenv install flask-marshmallowpipenv install flask-sqlalchemypipenv install marshmallow-sqlalchemy After running those commands marshmallow and SQLAlchemy will be installed internally as dependency. Step 3: Create app.py File Copy touch app.py touch app.py Step 4: Add This Code to app.py File Copy from flask import Flaskapp = Flask(__name__) @app.route(‘/’)def hello_world(): return ‘Hello, World!’ if __name__ == ‘__main__’: app.run(debug=True) from flask import Flaskapp = Flask(__name__) @app.route(‘/’)def hello_world(): return ‘Hello, World!’ if __name__ == ‘__main__’: app.run(debug=True) Step 5: Start pipenv Shell Copy pipenv shell pipenv shell Step 6: Run Flask Server Copy python app.py python app.py Step 7: Go to the Browser Start your favorite browser and go to the http://localhost:5000/ url and you will see Hello, World! printed. Step 8: Integrate SQLAlchemy & Marshmallow Add the following imports into the app.py file. import osfrom flask_sqlalchemy import SQLAlchemyfrom flask_marshmallow import Marshmallow And add the following code after the creation of Flask app instance. Copy basedir = os.path.abspath(os.path.dirname(__file__))app.config[‘SQLALCHEMY_DATABASE_URI’] = ‘sqlite:///’+ \ os.path.join(basedir, ‘db.sqlite3’) db = SQLAlchemy(app)ma = Marshmallow(app) basedir = os.path.abspath(os.path.dirname(__file__))app.config[‘SQLALCHEMY_DATABASE_URI’] = ‘sqlite:///’+ \ os.path.join(basedir, ‘db.sqlite3’) db = SQLAlchemy(app)ma = Marshmallow(app) Step 9: Create Model Declare the model like following. Copy class NoteModel(db.Model): id = db.Column(db.Integer, primary_key=True) title = db.Column(db.String(100)) content = db.Column(db.String(255)) def __init__(self, title, content): self.title = title self.content = content class NoteModel(db.Model): id = db.Column(db.Integer, primary_key=True) title = db.Column(db.String(100)) content = db.Column(db.String(255)) def __init__(self, title, content): self.title = title self.content = content Step 10: Create Schema Generate marshmallow schema from the model. Copy class NoteSchema(ma.SQLAlchemyAutoSchema): class Meta: model = NoteModel class NoteSchema(ma.SQLAlchemyAutoSchema): class Meta: model = NoteModel Step 11: Build Out API Actions Copy note_schema = NoteSchema() notes_schema = NoteSchema(many=True) @app.route(‘/note/’)def note_list(): all_notes = NoteModel.query.all() return jsonify(notes_schema.dump(all_notes)) @app.route(‘/note/’, methods=[‘POST’])def create_note(): title = request.json.get(‘title’, ‘’) content = request.json.get(‘content’, ‘’) note = NoteModel(title=title, content=content) db.session.add(note) db.session.commit() return note_schema.jsonify(note) @app.route(‘/note//’, methods=[“GET”])def note_detail(note_id): note = NoteModel.query.get(note_id) return note_schema.jsonify(note) @app.route(‘/note//’, methods=[‘PATCH’])def update_note(note_id): title = request.json.get(‘title’, ‘’) content = request.json.get(‘content’, ‘’) note = NoteModel.query.get(note_id) note.title = title note.content = content db.session.add(note) db.session.commit() return note_schema.jsonify(note) @app.route(‘/note//’, methods=[“DELETE”])def delete_note(note_id): note = NoteModel.query.get(note_id) db.session.delete(note) db.session.commit() return note_schema.jsonify(note) note_schema = NoteSchema() notes_schema = NoteSchema(many=True) @app.route(‘/note/’)def note_list(): all_notes = NoteModel.query.all() return jsonify(notes_schema.dump(all_notes)) @app.route(‘/note/’, methods=[‘POST’])def create_note(): title = request.json.get(‘title’, ‘’) content = request.json.get(‘content’, ‘’) note = NoteModel(title=title, content=content) db.session.add(note) db.session.commit() return note_schema.jsonify(note) @app.route(‘/note//’, methods=[“GET”])def note_detail(note_id): note = NoteModel.query.get(note_id) return note_schema.jsonify(note) @app.route(‘/note//’, methods=[‘PATCH’])def update_note(note_id): title = request.json.get(‘title’, ‘’) content = request.json.get(‘content’, ‘’) note = NoteModel.query.get(note_id) note.title = title note.content = content db.session.add(note) db.session.commit() return note_schema.jsonify(note) @app.route(‘/note//’, methods=[“DELETE”])def delete_note(note_id): note = NoteModel.query.get(note_id) db.session.delete(note) db.session.commit() return note_schema.jsonify(note) Step 12: Setup Database Enter in python shell Copy python>> from app import db>> db.create_all() python>> from app import db>> db.create_all() Step 13: Test APIs We can use the tool Postman to test our APIs. But before that please ensure your development server is up and running using this command python app.py from Step 6. The complete code of this article can be found in this repository.
We dive into multiple tasks every day and come across hundreds of difficulties. Which is pretty natural for a software engineer’s life. Things get challenging, but we excitedly accept that challenge to overcome each and every task in our daily lives. Because our clients rely on us to solve obstacles, and we are always up for the task at hand. We seek solutions that benefit both our clients and their users. We love that fact to make things easier. Today, I’d like to give a real-world example of how we solved a problem for one of our development processes: detecting and stopping recursive loops in AWS Lambda functions. This particular story demonstrates the technical issues we face on a regular basis and how we overcome them through leveraging AWS principles and our experience as well as tackling each problem from a new perspective. Event-driven solutions In Retry Mechanism Allow me to relate our real-life experience. So, we formed a pipeline to collect data from the source items. This is how it worked: Consider it a line at the store, with events waiting their turn. When an event reaches the front, we manage it according to our requirements and then transmit the data to its new location. Let’s explain it from a technical point of view. We have a FIFO queue, Where the event comes to the queue. We process it based on our requirements, and they will take the data and download it to the destination bucket. However, we occasionally encountered a stumbling block and were unable to retrieve data from the source URL in a timely manner. Isn’t this frustrating? Especially since our major purpose, from a business standpoint, was to promote our merchandise immediately. We’ve been brainstorming on how to tackle that hiccup and tried to resolve that in a way: We set up a retry system to handle it smoothly. This is a basic explanation: If my item cannot be processed effectively due to unavailable source data, we purposely transfer it to the dead letter queue. Following that, we wait for a predetermined length of time (DelaySeconds) before attempting to process it again. Now, in our dead letter queue, we’ve set the DelaySeconds property value to 15 seconds right off the bat. With this approach, we avoid waiting within the lambda function. Once 15 seconds have passed, the message arrives in the Dead Letter Queue (DLQ) and updates a record by increasing the retry count and renewing the deduplication ID and group ID. This guarantees that the main queue recognizes the event as new because we are sending it there. This process continues until either the item is successfully processed or the maximum number of retries is reached. What Is DelaySeconds? DelaySeconds is a parameter commonly used with message queues in distributed systems or messaging systems such as Amazon Simple Queue Service (SQS) or Apache Kafka. In the context of SQS, DelaySeconds refers to the amount of time a message is held in the queue before it is accessible for processing by consumers. This delay is useful when you wish to separate the generation and consumption of messages in your system, or when you need to verify that certain requirements are met before a message is handled. For example, if your system allows users to cancel an activity within a specified time frame, you may wish to delay performing the action until the cancellation window has passed. In this situation, you might add a DelaySeconds parameter to the message indicating the action to ensure it is not handled until the cancellation window expires. Basics of Dead Letter Queue: Why Messages End Up There A dead letter queue serves as a holding area for messages that cannot be sent successfully. It is used in messaging systems to manage messages that cannot be processed or sent as expected. Here’s an example. Assume you’re sending messages from one app to another. If a message experiences an error, such as being malformed or being unable to locate the receiver, it is placed in the dead letter queue rather than being permanently lost. This allows you to analyze why the communication failed and take appropriate steps to resolve the issue. Now, what our DLQ basically handles is this: It updates the retry count It tweaks the message duplication ID and updates the message group ID Later, it bounces the message back to the Main queue for another round. In the worst-case situation, we predict that the data will appear in the source item within 5 minutes. As a result, we’ve scheduled a 15-second interval for the following attempt, with a 5-minute pause in between. We pounded away around 20 times in 15 seconds, hoping to make a breakthrough. Normally, a couple of tries are enough, but this time, no dice. Jump Into The Scenario: Our system had been running smoothly for months when suddenly, AWS sent us a warning. Turns out, they caught wind of some recursive detection mischief. As we started integrating, we discovered a sneaky message attribute switcheroo that occurs when our events reach the main queue. We initially assumed it was harmless, but AWS was not having it. They have this rule: if your lambda is invoked 16 times in a row by the same event, it is marked as a recursive loop. We modified the retry count, Deduplication ID, and Sequence Set group ID to prevent the event from being repeated. Despite our efforts, AWS identified it as the same event. We were puzzled as to why AWS saw it that way even after the changes. But wait, there is more than one way to break this nut. We could have contacted AWS for assistance, but where’s the fun in that? We decided to roll up our sleeves and take on the challenge ourselves. In essence, our approach involved adjusting two key parameters: the DelaySeconds property and the MAX_RETRY_COUNT_VALUE. By increasing the DelaySeconds property value, we effectively extended the time interval before retrying a process. This adjustment allows for more time between attempts, potentially providing additional opportunities for success or resolving underlying issues. Simultaneously, we reduced the MAX_RETRY_COUNT_VALUE (<16), which limits the maximum number of retry attempts. This reduction implies a more cautious approach, limiting the number of retries to prevent excessive resource consumption or potential system overload. Overall, this strategy aimed to strike a balance between giving processes adequate time to execute successfully while also preventing excessive retry attempts, thereby optimizing system performance and reliability. Rolling Into Some Technical Facts: Detecting and Stopping Recursive Loops in AWS Lambda Functions If you’ve ever used Lambda functions, you know how effective they are for developing serverless apps. However, with tremendous power comes great responsibility, and recursive loops can cause devastation if unchecked. We’ll go over everything you need to know about recursive loops in Lambda functions, including how they’re recognized, what actions AWS takes when recursion is found, and how you may change recursion detection settings. Recursive loops can occur unintentionally in Lambda functions owing to programming faults or unanticipated input data. Consider a scenario in which one Lambda function invokes another, which then triggers the first. Without suitable recursion detection tools, this could result in an unending loop that consumes resources and reduces application performance. To avoid such circumstances, AWS Lambda has built-in recursion detection techniques that detect and terminate recursive loops before they cause harm. Overview Lambda functions can be triggered in a variety of ways within AWS. Events generated by AWS services can be used to activate Lambda functions, which can then communicate with other AWS services via message sending. Ideally, the service or resource that triggers the Lambda function should be different from the one that it outputs. However, due to misconfiguration or code issues, a function may mistakenly return a processed event to the same service, resulting in a cyclical loop. Lambda now detects when a function runs in a loop between supported services, resulting in a RecursiveInvocationException after 16 invocations. There are no additional charges associated with this functionality. Lambda routes asynchronous invocations to a dead-letter queue or an on-failure destination if defined. Consider the following example of an order processing system: An initial order information message is sent to the source SQS queue. Lambda retrieves the message from the source queue via an ESM. Following processing, Lambda delivers the modified orders message to a destination SQS queue via the SQS SendMessage API. A dead-letter queue (DLQ) is configured for the source queue to handle any failed or unprocessed messages. When Lambda sends the message back to the source SQS queue instead of the destination, a recursive loop of function invocations is created. After 16 invocations, Lambda throws a RecursiveInvocationException to the ESM. The ESM stops further invocations, and when the maxReceiveCount is reached, SQS forwards the message to the preset DLQ for the source queue. Troubleshooting instructions for the function are supplied via an AWS Health Dashboard message and an email sent to the registered account address. Lambda also emits a CloudWatch statistic called RecursiveInvocationsDropped, which can be accessed using the CloudWatch console. How Does Lambda Detect Recursion? Lambda utilizes a mix of approaches to detect recurrent loops: Invocation History: Lambda tracks each function’s invocation history. If it detects a pattern of a function invoking itself excessively in a short period of time, it issues a recursion detection alert. Call Stack Analysis: Lambda monitors the call stack for each function invocation. If it finds a recursive pattern in which the same function is called repeatedly within a short period of time, it activates the recursion detection mechanism. Actions to Take When Lambda Stops a Recursive Loop When Lambda identifies a recursive loop in a function, it takes numerous steps to address the problem and prevent more resource consumption: Abort Invocation: Lambda aborts the current function invocation. Log Error Message: Lambda generates an error message indicating that a recursive loop was found and terminated. Throttle Invocation: Lambda may use throttling to prevent excessive function invocation. Let’s split down these actions into coding examples: 1. Abort Invocation: Consider a Lambda function written in Python that performs a recursive Fibonacci calculation: If this function accidentally enters a recursive loop due to a programming error or unexpected input, Lambda will abort the invocation to prevent further resource consumption. 2. Log Error Message: Lambda logs error messages to provide visibility into the occurrence of recursive loop detections. You can view these logs in the AWS CloudWatch console. In this example, if a recursive loop is detected, Lambda logs an error message with details about the recursion error. 3. Throttle Invocation: Lambda may apply throttling measures to prevent excessive invocation of the function. Throttling limits the rate at which requests are accepted by the function. In this example, if a recursion error occurs, the function sleeps for a specified duration before retrying the invocation. This helps prevent overwhelming the Lambda service with repeated invocations during a recursive loop. By implementing these actions, Lambda effectively manages recursive loops and ensures the reliability and stability of serverless applications. Disabling Recursion Detection While recursion detection is a useful function, there may be times when you need to disable it temporarily. For example, if you purposely use recursive methods like tree traversal or graph traversal, the recursion detection process may generate false positives. To deactivate recursion detection, change the CloudWatch Logs retention settings for your Lambda function. By setting the retention period to “Never Expire,” you basically turn off recursion detection for that function. However, this functionality should only be used when you are convinced that the recursive behavior is purposeful and will not result in infinite loops. For further information on how to properly employ recursive invocation patterns, see the AWS Lambda Operator Guide’s section titled “Recursive Patterns Causing Run-Away Lambda Functions“. Final Verdict While recursion is an effective programming method, it can potentially have unforeseen repercussions if not used correctly. Fortunately, AWS Lambda includes built-in capabilities for detecting and mitigating repetitive loops, ensuring that serverless applications are reliable and stable. Understanding how recursion detection works and taking appropriate actions when necessary allows you to maximize the potential of AWS Lambda while reducing the hazards associated with recursive loops. Remember to thoroughly test your Lambda functions and watch their behavior in production to identify any unexpected recursion concerns early on. With careful planning and attention to detail, you may confidently use serverless computing. Also, I’m suggesting everyone read another resourceful insight from Detecting and stopping recursive loops in AWS Lambda functions for better understanding.
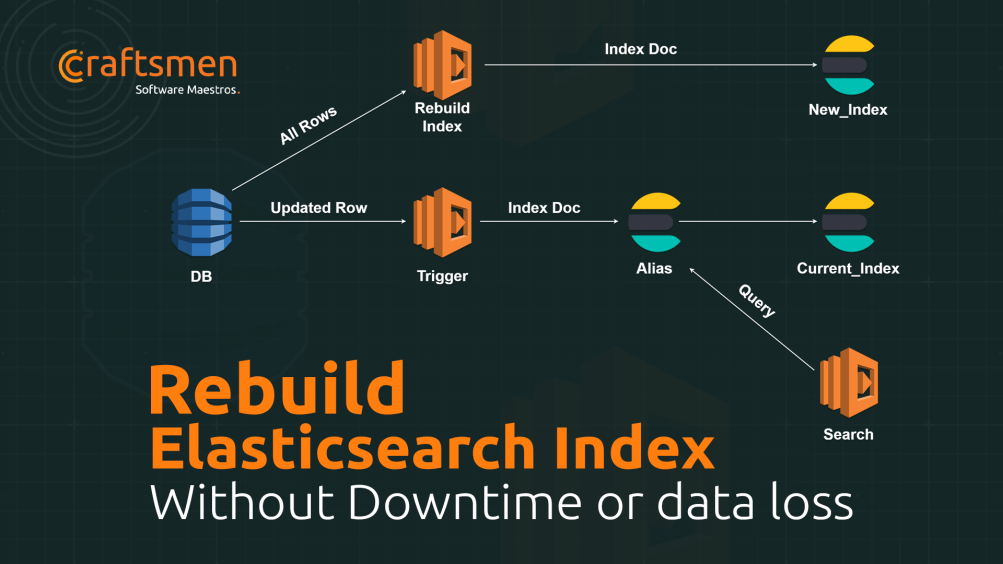
Elasticsearch allows us to add fast full-text searching and autocomplete features to our projects very easily. We can create an “index” in Elasticsearch and store the items we want to search as JSON documents into the index, to be able to run queries depending on different fields of the documents. Do we ever really need to rebuild an index? Yes. There are situations when this becomes unavoidable. For example, if we need to change any of the existing field mappings or analyzers. ES in general does not allow this. So you need to build a new index separate from the existing one. Can we keep the same index name? No. In order to have a smooth transition in a live system, we need to keep the old index alive while we are building the new one. So we cannot use the existing name for the new index while the old one still lives. What about code that refers to the old index? It can be a problem to update code to use the new index name every time we rebuild. So we should actually not write code that directly uses the index name for searching and indexing. Not use the index name? Then what? Alias! We should make an alias to the index, and use that in our searching/indexing code. Then we can update the alias in ES to point to the new index whenever we rebuild. This way, our code that accesses the index does not need to change every time we rebuild the index. How to keep an index up to date with changes to the source data? Usually, the ES index consists of data coming from a more persistent storage, e.g., a table in DynamoDB. We can have a trigger set up on the source database table, so that on any modifications to any row, we get a chance to run our indexing code (e.g., with AWS Lambda) for that modified row. How do we actually (re)build an index? When we need to build an index, we first create the index with new mappings/analyzers and other required settings, then we go through all the rows of the table, and index each row as a document in the new ES index. Can’t we just use the _reindex API? The _reindex API takes a snapshot of the source index and copies the documents to the destination index. It is better to have our own code for building an index from source data instead of relying on the _reindex API, because the old index may not have stored source documents with all the fields required for the new index. So when do we switch over? When we are done building the new index, we can update the alias to point to the new index instead of the old one. ES can do this atomically. Then we can delete the old index. Alias points to the new index after rebuilding is done Wait, I know a case when this will not work… Indeed! In a live system, there can be continuous updates happening to the source data while the new index is being built. Suppose we just indexed row1 in the new index while building it. Then before the the whole rebuild completes and we switch the alias over, row1 gets modified by a user, as a result of which a DB trigger fires that indexes it in the old index. After the switch, when we query the new index, we will get old data for row1, since the new data did not get indexed in the new index. Can we solve this? We can, by using two aliases instead of one. One for queries (let’s call it read_alias), and one for indexing (write_alias). We can write our code so that all indexing happens through the write_alias and all queries go through the read_alias. Let’s consider three periods of time: Before rebuild read_alias: points to current_index write_alias: points to current_index Before rebuild: both aliases point to the same current_index All queries return current data. All modifications go into current_index. During rebuild read_alias: points to current_index write_alias: points to new_index During rebuild: read and write aliases point to different indices All queries keep getting data as it existed before the rebuild, since searching code uses read_alias. All rows, including modified ones, get indexed into the new_index, since both the rebuilding loop and the DB trigger use the write_alias. After rebuild read_alias: points to new_index write_alias: points to new_index After rebuild: both aliases point to the same new_index All queries return new data, including the modifications made during rebuild. All modifications go into new_index. Can we get the modified data even while rebuilding? It should be possible to do even that, if we make the DB trigger code index modified rows into both the indices while the rebuild is going on (i.e., while the aliases point to different indices). DB trigger updates both indices during rebuild At Craftsmen, we have been using Amazon Elasticsearch Service for a long time and this is how we have been rebuilding index without having any downtime or data loss.
Recently I have written a Python script for my Manager. The purpose the script was to read some JSON data, apply some business rules on them, generate a CSV(Comma Separated Value) file and upload it in a Google Spread Sheet. The sheet helped my manager to get insight of the JSON data so that he can take action based on it. The JSON data and business rules of the script are very specific for my manager. But the way I managed to import the generated CSV file to Google Sheet is very generic. So what I have decided is that I will write an article on how I have uploaded the CSV file to Google Spread Sheet and this article is the result of it. In that Python script I have used a library called gspread. gspread is a Python API for Google Sheets. It’s a very good Python library for interacting with Google Sheet as it is very simple and straight forward. For interacting with Google Sheet API first thing we have to do is create a project in Google Developers Console and enable some APIs. To do that just follow the steps below. 1. Click on this link to create a project 2. Give the project a name 3. Go to project dashboard and click on + ENABLE APIS AND SERVICES 4. Search for Google Drive API and click on it 5. Enable Google Drive API 6. Click on Create Credentials 7. Select the parameters and click on What credentials do I need? 8. Enter a Service Account Name and select Role. A JSON file will be downloaded. We will need this JSON file in our script. So rename that file as client_secret.json. The content of the JSON file is as follows. Now go to your Google Drive and create an Google Sheet and name it CSV-to-Google-Sheet. Copy client_email value from the JSON file you have downloaded above and share that Google Sheet to this client_email with edit permission like the image below. At this point we have everything set up, so lets write our Python script to upload a CSV file in the Google Sheet. For this purpose we have to install gspread Python library. So open up the terminal and run the following commands. Now create a Python file and name it upload.py. Copy and paste the following code in it. What we are doing here is import gspread and ServiceAccountCredentials, then we defined the scope and load the credentials from the JSON file we have download above. Then we are authorizing with the credentials and getting client object. We are using that client object to open the Google Sheet CSV-to-Google-Sheet. Finally we are reading the CSV file using open built-in function of Python and importing it to the Google Sheet by that client object. Now run the Python script with this command python upload.py and open CSV-to-Google-Sheet Google Sheet in your browser. You will see that your Google Sheet is updated with the content of the CSV file as follows. You can do more stuff with Google Sheet using gspread library. Checkout their documentation to learn more. The complete code of this article can be found in this repository.
Assume, you’ve got a cool project on the horizon, but you need a bit of extra brainpower to make it shine. That’s where team augmentation comes in! Now, if you are very new to the term ‘Team augmentation’, you may ask what is team augmentation? Team augmentation, also known as staff augmentation or team extension, is like adding a new member to your squad but with a twist! Businesses team up with outside talent to bring fresh skills and expertise. They complement their existing workforce. Instead of hiring new people, you can team up with experts who are skilled and ready to help. Why is this important? Imagine having access to a whole new pool of talent without the hassle of permanent hires. Team augmentation helps scale up your team when needed, controlling costs effectively. Scaling back is easy after project completion. Furthermore, a mix of experts speeds up projects with fresh ideas and views. Boost your creativity and reach the finish line quicker! Team augmentation is key for agility, competitiveness, and staying ahead in today’s world. You will delve deeply into the world of team augmentation in this blog. You’ll see why it’s so groundbreaking for businesses of all sizes and industries. Learn all about team improvement and how it can change your team and projects. Gain valuable insights and practical knowledge about its benefits. Get ready to level up your understanding. Table of Contents Understanding Team Augmentation The Evolution of Team Augmentation in Modern Businesses Benefits of Team Augmentation Types of Team Augmentation Models How to distinguish between IT, Tech, and Software Team Augmentation? Managing Augmented Team Challenges and Obstacles in Implementing Team Augmentation Overcoming the Challenges and Obstacles in Implementing Team Augmentation Best Practices for Successful Team Augmentation Integration Real-world Examples of Team Augmentation Insights into the Outcomes and Benefits Future Trends and Developments in Team Augmentation FAQ Conclusion Understanding Team Augmentation To begin with, team augmentation involves more than just bringing on extra help. It involves strategically boosting your team’s capacity to achieve particular targets and goals. Team augmentation customizes solutions for difficult projects, business growth, and product development speed-up. It meets your unique needs. Let’s now discuss the goals and purposes of team augmentation. Team augmentation aims to boost your team’s skills, knowledge, and productivity. Bringing in trained experts can boost your team’s productivity and performance. With team augmentation, you can take on new projects to succeed. It helps meet deadlines and close skill gaps. Team augmentation is more than just a way to reach a goal — it’s a strategic investment in your team’s success. Define clear goals for your team and grasp the purpose of team enhancement. This helps you discover new opportunities and move your business ahead confidently. The Evolution of Team Augmentation in Modern Businesses Team augmentation has evolved greatly from the start. It used to be a unique concept, but now, it’s a common strategy in today’s fast-paced business world. Technology has evolved, and global markets are more connected now. This has led to a higher demand for adaptable workforce solutions that can grow with the needs. Team augmentation is initially used temporarily for projects or to fill skill gaps. It was employed in existing teams. Companies saw benefits in global talent, expanding team augmentation capabilities. The breadth and depth of team augmentation expanded worldwide. Team augmentation offers flexibility, scalability, and access to elite talent, vital for business. It’s a key component of contemporary business strategy. Startups can use team augmentation to grow fast. Established companies use it to boost their staff. Team augmentation is growing and will continue in the future. We expect more team augmentation as companies aim to stay competitive. The world changes due to technology, remote work, and the gig economy. Benefits of Team Augmentation Several benefits of team augmentation can greatly improve an organization’s capacity and output. We will discuss some of the strong benefits of team augmentation in this section. 1. Flexibility: Team augmentation offers great flexibility. Businesses can easily adjust their workforce size based on project needs. Businesses can benefit from new opportunities and adapt quickly to changing market conditions. This flexibility allows them to avoid the constraints of standard hiring processes. 2. Access to Talent: Team augmentation gives access to global talent for specialized knowledge and skills. Local options may lack the same expertise. Diverse talent fosters creativity and innovation. It brings new ideas and perspectives. 3. Cost-effectiveness: Team augmentation lets businesses hire top talent as needed without big upfront costs. The pay-for-performance model cuts costs and boosts profits, appealing to all businesses. 4. Collaborative Environment: Team augmentation fosters an environment of collaboration and knowledge sharing. Working with professionals broadens skills, introduces tech, and keeps teams updated on trends. Encourage ongoing learning for growth. It drives both individuals and organizations. Team augmentation has many advantages for businesses in today’s business world. Team augmentation offers flexibility and talent availability. It enhances collaboration and saves costs. Types of Team Augmentation Models Team augmentation has different options, all tailored to meet specific needs. Here is the lowdown: 1. IT Team Augmentation: Think of IT augmentation as your digital sidekick. These tech experts help your systems run smoothly and keep your networks secure. No more tech worries with them around. The IT augmentation team can help you set up servers, manage databases, and fix IT problems. 2. Tech Team Augmentation: The techies are the creative minds behind the gadgets and gizmos that make our world go round. Tech team augmentation gathers a varied team of experts. They include smart developers and talented designers. These professionals help you achieve your digital aspirations. If you’re working on a cool new mobile app, website, or AI project, the tech team is here to bring your ideas to life. 3. Software Team Augmentation: Finally, there are software experts who designed the code for our beloved software. Software team augmentation means adding top talent to your development team. This can be for creating new software or improving existing applications. The software team can assist you with coding, testing, or improving your software. How to distinguish between IT, Tech, and Software Team Augmentation? Now you might be wondering what distinguishes IT, tech, and software team augmentation. Well, it all comes down to specialization. Each type of team augmentation aims to enhance your team’s abilities and successes. They each offer unique skills and expertise to help you reach your goals. Here are the key differences between IT, Tech, and Software Team Augmentation. IT Team Augmentation: Keeping your digital infrastructure in top shape. Tech Team Augmentation: Bringing your digital visions to life through creativity and innovation. Software Team Augmentation: Enhancing your development efforts with expert coding skills. Managing Augmented Team So you’ve got an awesome augmented team to help you out, but what now? Don’t worry; managing them is easier than you might think. Here are some extremely helpful tips to help you work with your augmented team like a pro: 1. Clear Communication is Key: First things first: keep those lines of communication open! Make sure everyone on your team understands what is going on, what they need to do, and how to contact you if they have any questions. Make sure everyone hears you and feels important. 2. Set Clear Expectations: Tell your augmented team what you expect from them. Be clear about deadlines, project objectives, and the level of work you expect. Staying on track is easier with a clear goal for better results. Everyone must understand their work to achieve this. 3. Foster a Positive Team Culture: To build a great team, you need to finish work and make a friendly, happy space where everyone feels valued. Encourage collaboration, celebrate achievements, and don’t forget to have some fun! 4. Provide the Right Tools and Resources: Make sure your augmented team has everything they need to perform at their best. Invest in the tools and resources your team needs to do well. This includes software, training materials, and even a comfy chair. These things can help your team perform better. 5. Be Flexible and Adapt to Change: Things don’t always go as planned, and that’s okay! Maintain flexibility and be prepared to adapt to changes as they occur. Roll with sudden changes in projects or team members and keep moving forward. 6. Show Appreciation and Recognition: Don’t forget to appreciate your augmented team! A quick ‘thank you’ helps your team feel valued and appreciated. Recognize their hard work and celebrate their achievements. Trust us, it matters. 7. Regular Check-Ins and Feedback: Maintain open lines of communication by scheduling regular check-ins and feedback sessions. Check-in with your expanded team regularly. See how they are doing and give helpful feedback for their development. 8. Stay Organized and Stay on Track: Last but not least, stay organized and on track! Track deadlines, project milestones, and team progress to keep everything on schedule. Staying organized is important. Keep deadlines, project milestones, and team progress in check to ensure smooth teamwork. Challenges and Obstacles in Implementing Team Augmentation There are certain difficulties when implementing team augmentation. Let’s discuss the typical problems and barriers that team augmentation implementations may face. 1. Finding the Right Talent: Selecting the ideal candidate for your team is one of the most difficult tasks. You’re looking for experienced professionals who are good team players. It’s like finding a needle in a haystack. Don’t give up. If you’re patient and keep trying, you’ll find the best team members! 2. Integrating New Members: Now that you’ve identified your ideal team members, what comes next? It can be a little challenging to seamlessly integrate them into your current team. It might take them a while to get used to how your business works and fits their way of doing things. Be patient with them, give them what they need, and cheer them on to start quickly. 3. Communication Hiccups: Yes, effective communication is essential to any team’s success. When working with a varied team, messages can sometimes be misunderstood. Handle hiccups promptly. Keep lines of communication open despite barriers like time zones. 4. Balancing Workloads: With new team members on board, you might end up handling extra tasks than before. Balancing everyone’s work and needs can be hard without feeling overwhelmed. When giving out tasks, consider the strengths and weaknesses of each team member. Don’t be afraid to assign work accordingly. 5. Maintaining Team Cohesion: To achieve success, you need a strong team. However, it can get tricky when your team includes both inside and outside members. Ensure everyone, no matter where they are, feels like part of one team. Encourage teamwork and positivity, promoting collaboration. 6. Adapting to Change: The only thing that is constant in the world of team augmentation is change. You’ll need to be flexible and adjust to change. It can happen due to project priorities, new team members, or unforeseen difficulties. Accept adaptability, roll with the punches, and maintain focus on the goal. 7. Ensuring Accountability: Ensuring accountability in a distributed team can be tough. Without face-to-face interaction, team members might easily blame each other or be overlooked. Establish clear objectives, due dates, and indicators. Hold everyone accountable for team success. 8. Managing Expectations: Not to mention, it’s critical to manage expectations. Communicate openly and honestly with your team. Discuss your expectations of them and any challenges that may arise. Be prepared to change direction when necessary, communicate honestly, and set reasonable goals. Overcome obstacles with ease using the right strategy and positive mindset. You can do it! If there is anything else you would like to know, please let me know. Overcoming the Challenges and Obstacles in Implementing Team Augmentation When adding more team members, you might face some challenges. You can conquer these obstacles with ease. Let’s discuss how to easily overcome those obstacles. 1. Finding the Right Talent: Solution: Cast a Wide Net. When it comes to finding the perfect fit for your team, don’t be afraid to cast a wide net. Try out various ways to recruit, like job boards and professional networks. Welcome candidates with different backgrounds and skills. Remember, the right talent is out there – you just have to find them! 2. Integrating New Members: Solution: Onboarding with Care. A solid onboarding plan is the initial step in welcoming new team members. Give them a friendly welcome. Introduce them to your team and business culture. Give them the tools to start easily. It only takes just a little bit of care and attention to help them feel completely at home. 3. Communication Hiccups: Solution: Foster Open Communication. We cannot emphasize enough how important communication is! Encourage regular updates. Create an open communication culture in your team. Provide various ways to communicate, like chat, email, and video calls. Those breakdowns in communication will stop when everyone feels valued and heard. 4. Balancing Workloads: Solution: Delegate Like a Boss. The key to managing workloads is delegation. When assigning tasks, think about what each person is good at and where they may need support. Also, remember how much each person can handle. Remember that teamwork is what makes the dream come true, and don’t be afraid to ask for help when you need it! 5. Maintaining Team Cohesion: Solution: Foster Team Bonding. Fostering a sense of unity and belonging is the key to maintaining team cohesion. Plan team-building exercises, promote cooperation, and provide your team with chances to interact personally. When everyone feels like they belong to the same group, team unity becomes stronger. 6. Adapting to Change: Solution: Embrace Flexibility. Change is unavoidable; what matters is how you handle it. Accept change, remain nimble, and be ready to adjust as circumstances arise. Stay focused, stay positive, and always remember that you can succeed. 7. Ensuring Accountability: Solution: Set Clear Expectations. Creating clear expectations is the first step toward ensuring accountability. Share openly about goals, deadlines, and how well you perform. Make sure everyone is responsible for what they do. With clear expectations established, accountability will become second nature. 8. Managing Expectations: Solution: Be Transparent. Transparency is key when managing expectations. Make sure your team knows what you need from them, what you’ll do for them, and any issues that might come up. When everyone gets on the same page, magic happens! Here are some tips to help you overcome challenges when implementing team expansion. To easily beat those challenges, use teamwork, patience, and persistence. Best Practices for Successful Team Augmentation Integration Are you prepared to enhance your team augmentation integration to a greater level? To make sure everything goes smoothly, think about these very useful best tips. 1. Establishing Clear Goals and Expectations: Getting everyone on the same page is the easy solution to this problem. Clarity is essential for a successful team augmentation process. Make sure everyone in your team, including new members, knows what is expected and what goals to aim for. Make sure everyone knows their goals, what success is, and how they fit into the big picture. Incredible things occur when all parties are in agreement! 2. Implementing Robust Onboarding and Training Programs: Setting them up for Success is the Easy Fix for this. Training and onboarding help everyone, not just new employees. It’s also important for introducing additional team members smoothly. Offer complete onboarding and training. Equip new hires with everything they need to start promptly. Help them succeed from the start with online guides, mentoring, and orientation. 3. Best Ways to Integrate Extra Team Members Successfully: It’s simple to encourage connection and collaboration. To integrate new team members well, encourage bonding and teamwork. Urge your current team members to extend a warm welcome to their new teammates. Give them opportunities to chat online, have meals together, or share hobbies. Integration is easy when everyone feels like they’re on the same team! You’ll become an integration whiz in no time if you have these easy fixes in your toolbox! Real-world Examples of Team Augmentation Now let’s explore some real-life examples of team augmentation! Actual examples show that getting more help can create amazing outcomes. And don’t worry, We’ll make things straightforward. 1. Uber’s Partnership with Andela: Uber partners with Andela, experts in software engineer recruitment. They specialize in hiring. Andela provided Uber with highly skilled software engineers to boost its development team. Uber scaled engineering quickly, advanced product development, and satisfied the expanding user base. This was due to the partnership. 2. Spotify’s Collaboration with Pentalog: Spotify and Pentalog teamed up to work together. Pentalog supplemented Spotify’s internal engineering team with a group of skilled developers. Spotify maintained its edge in music streaming, enhanced user experience, and added features. 3. Airbnb’s Engagement with Toptal: Airbnb works with Toptal, a platform connecting companies with top freelance workers. Airbnb got a skilled team from Toptal for product development support. By partnering with Airbnb, they took advantage of specialized knowledge and new features. This helped them shorten project durations and enhance host and guest experiences. 4. Netflix’s Collaboration with Wipro: Netflix, a popular streaming platform, collaborated with Wipro, a global IT consulting company. A team of tech experts from Wipro helped Netflix with its IT operations and support team. Netflix and Wipro teamed up. Wipro’s tech specialists helped Netflix run better. This made Netflix’s shows play smoother for millions worldwide. Insights into the Outcomes and Benefits: What benefits did these businesses receive from collaborating with additional support? Let’s break it down: Faster Innovation: These businesses could produce new features and updates more quickly and keep their users satisfied by utilizing more talent. Streamlined Operations: With additional help, they could concentrate on their strengths and delegate the technical heavy lifting to their partners. Global Reach: These businesses were able to access a variety of viewpoints and ideas by working with specialists from around the globe, which improved their products even further. These real-world instances highlight the effectiveness of team augmentation! Future Trends and Developments in Team Augmentation It’s like looking ahead to see what exciting new adventures await us. And don’t worry, we’ll keep it nice and simple! Predictions for How Team Augmentation Will Change in the Future: 1. Rise of Remote Work: Prepare for increased remote working! We’ll see more people working remotely and forming virtual teams as technology progresses. Team augmentation will offer flexible options for businesses to hire talent worldwide. 2. Specialization and Niche Expertise: We expect more specialized skills in team support as projects get more complex. Businesses seek partners with specialized knowledge to address complex challenges effectively. They look for experience in the relevant field. 3. Integration of AI and Automation: Automation and AI will augment teams, optimize workflows, and increase output greatly. AI tools will help teams work faster and better. These tools will automate repetitive tasks, study data, and provide insights. 4. Expansion of Gig Economy: The gig economy keeps expanding, offering skilled workers many contract and freelance chances. By using this talent pool, businesses can access specialized knowledge project by project. 5. Focus on Diversity and Inclusion: Diversity and inclusion are important for team growth. Businesses will focus on working with diverse teams and talent. Accept different viewpoints and experiences for creative solutions and improved results. This benefits all parties involved. 6. Emphasis on Soft Skills: Soft skills such as teamwork, communication, and adaptability are vital for team enhancement. Technical skills are also important. Businesses will look for partners who have the right tech skills and fit well with their team. 7. Continuous Learning and Upskilling: Businesses and team suppliers will focus on learning and improving skills. Staying updated on new technology and skills is vital for staying competitive. Prepare for team augmentation changes by watching upcoming trends and developments closely. Keep an eye on the fascinating changes ahead. Embrace innovation. Stay adaptable. Adjust to shifting workplace dynamics. Considerations for Choosing the Right Team Augmentation Partner It’s like picking the best partner for your project. We’ll explain it clearly so you can choose wisely. Factors to Consider & How to Evaluate When Selecting a Team Augmentation Provider: 1. Expertise: First and foremost, you want a partner with expertise! Find a partner who is specialized in your industry and has the skills you need. Ensure they have the needed skills for the job, whether it’s in software, design, or IT. Check their portfolio for evidence of expertise, like past projects or special skills. Ask about their team’s qualifications and how they stay updated on industry trends. 2. Experience: When it comes to team augmentation, experience is crucial. A partner with experience who can handle the highs and lows of project work is what you want. Examine their past work and customer feedback. Check if they have similar project experience. Look at their client list and past projects to evaluate their experience level. Check their history. Look at client happiness, industry fit, and project difficulty. 3. Cultural Fit: Not to mention, cultural fit is very important. You want a partner who fits in well with your team, is honest in communication, and shares your values. To ensure a good match, find someone you connect with personally. Working closely together will follow this. To assess cultural fit, have meetings or interviews with potential partners. Pay attention to values, communication style, and gut feelings. If it feels right, it probably Be mindful of your company’s values, responsiveness, and communication style. Follow your intuition; if it seems like a good fit, it most likely is! Select the best team augmentation partner. Consider knowledge, experience, and cultural fit. Remember, it’s key to find someone who can help make your ideas a reality! Frequently Asked Question 1. How Do IT, Tech, and Software Team Augmentation Models Differ? Team augmentation is popular in the tech, software, and IT industries, but each field has specific skill requirements. IT Team Augmentation: consists of experts in hardware, network administration, and cybersecurity with an emphasis on improving internal IT infrastructure. Tech Team Augmentation: Focuses on innovation and tech-driven projects by integrating IT with cutting-edge technologies like blockchain and artificial intelligence. Software Team Augmentation: Focuses on developing and maintaining software platforms; requires UX/UI designers, software engineers, developers, and QA testers. To select the best augmentation model for their project requirements, businesses should be aware of these differences. 2. What Are the Major Challenges in Implementing Team Augmentation and How Can They Be Overcome? Implementing team augmentation faces challenges like cultural differences, communication breakdowns, quality control issues, and integrating external teams. Overcome these hurdles by: Cultural Integration: Promote harmony using team-building exercises and cultural events. Communication: Hold frequent meetings and updates using dependable technologies. Quality Control: Clearly define objectives and keep a careful eye on development. Efficient Integration: Create comprehensive onboarding procedures to ensure a smooth integration. 3. What Future Trends and Developments Can We Expect in Team Augmentation? The future of team augmentation will be shaped by changes in organizational structures, technological improvements, and the need for specialized talents that are adaptable. Important patterns consist of: Automation and AI Integration: Simplifying hiring and onboarding procedures to more effectively match qualified candidates with open positions. Remote and worldwide Teams: As the use of remote work arrangements grows, there is a greater demand for talent that transcends national borders, creating a worldwide talent pool. Emphasis on Soft Skills and Cultural Fit: As technical skills become more widely available, augmented teams must place a higher priority on cultural fit and soft skills to succeed. 4. How We Ensure Effective Communication and Collaboration in Augmented Teams While Embracing Scandinavian Cultural Values? Successful augmented teams that incorporate Scandinavian cultural norms need to be built through collaboration and excellent communication. Here are a few simple ways to accomplish this: Accept Flat Hierarchies: By using a flat organizational structure, you may promote open communication at all levels. Encourage open dialogue and feedback meetings for all employees, regardless of position or level of experience. Use Collaborative Tools: Use internet resources such as Slack, Microsoft Teams, and Trello or Asana for project management. These solutions enable transparent cooperation regardless of physical location by facilitating instantaneous communication and teamwork. Establish Explicit Communication Norms: Make sure that everyone is aware of the proper channels, locations, and times for communication. Encourage asynchronous communication to honor personal space, take into account different time zones, and suit different working styles. Encourage Active Listening: Establish a setting where team members sincerely take into account one another’s perspectives. Promote dialogues and helpful critiques that appreciate other viewpoints to foster inclusivity and respect for one another. Promote Cross-Cultural Understanding: Give team members the chance to get to know one another’s cultural backgrounds and communication styles. Plan cultural sensitivity training or virtual team-building activities to promote empathy and understanding across cultural divides and fortify ties within the expanded team. 5. How We Leverage Scandinavian Cultural Values to Enhance Innovation and Creativity in Augmented Teams? In augmented teams, Scandinavian cultural values can foster creativity and innovation. Organizations can use these values in the following ways: Encourage trust and autonomy by granting team members independence and responsibility for their job. Giving people the freedom to experiment results in innovative solutions. Welcome Diverse Perspectives: To improve the team’s ideas, welcome cultural diversity as well as other types of variety. The inclusive principles of Scandinavia can stimulate innovative problem-solving via cooperation and idea-sharing. Prioritize Sustainability: Give top attention to eco-friendly solutions. The emphasis on sustainability in Scandinavian cultures can stimulate innovative approaches to societal problems that have a low environmental impact. Encourage Psychological Safety: Establish a setting where team members are at ease enough to take chances and share ideas. Because it allows for experimentation and learning from failures, psychological safety promotes creativity. Promote Ongoing Learning: Promote continuing education and growth. Giving team members room to grow allows them to experiment with new ideas and approaches, which stimulates creativity. By putting these tactics into practice, companies may take advantage of Scandinavian cultural values to build enhanced teams with a dynamic and creative environment that promotes cooperation and creativity and leads to success. Conclusion To sum up, team augmentation presents an extensive range of advantages and tactics for companies hoping to prosper in the ever-changing business environment of today. Set specific goals, and choose the right partner based on knowledge, experience, and fit. Invest in training for augmented team members to ensure smooth integration and communication. Flexibility is key for companies to adapt their workforce to changing needs. Sticking to these principles will allow you to use team augmentation to improve capabilities, encourage innovation, and succeed in a constantly changing marketplace. Now that you have a better understanding of team augmentation, it’s time to put theory into practice and use its transformative power in your organization.
Flask is a lightweight WSGI web application framework based on Python. It is designed in such a way that it will only supply the core components of a web application and it lets the developer choose rest of the things. It leaves all the design and architecture level decisions to the developer. As a result it is very easy to get started start with Flask. But day by day when the application gets bigger and more complex, it become very tough to maintain the code base. To resolve this problem Flask comes with Blueprint. Flask Blueprint or Blueprint for short, is a way to organize the related code base between python modules or packages. In this article we will learn how to use Blueprint to structure a Flask project. At the beginning, lets first create a hello world application in Flask. Create a file app.py and put the following code in it. from flask import Flask app = Flask(__name__) @app.route('/') def hello_world(): return 'Hello, World!' if __name__ == '__main__': app.run(debug=True) Copy What we have done here is that, first we have created an Flask application object by passing the name of the application’s module or package. Then we define a function hello_world and associates it with ’/’ url endpoint using route decorator of the app object. Now open up your terminal and write this command python app.py and hit enter. It will run your application on port 5000 of your machine. While the application is running, go to http://localhost:5000 in your favorite browser and see that Hello, World! is printed on it. As your basic Flask application is up and running. Now create a new file views.py and write the following code in it. from flask import Blueprint index_blueprint = Blueprint('index_blueprint', __name__) @index_blueprint.route('/index/') def index(): return 'This is flask blueprint example' Copy Here we have done the following things. We import Blueprint from flask. Created a Blueprint object and name it index_blueprint. And associates our index function with /index/ url endpoint using route decorator of index_blueprint. While creating the index_blueprint object, first we have passed the name of the blueprint that will be used in Flask’s routing mechanism. And then we have passed __name__ as the second argument which will be used by Flask to locate the Blueprint’s resources. Now that we have our blueprint object, we need to register it with app object. The following code base shows how to register index_blueprint with app object in app.py file. from views import index_blueprint app = Flask(__name__) app.register_blueprint(index_blueprint) Copy app.register_blueprint is the method we used here to register the blueprint with the app object. As we have registered our blueprint with the application, it’s time to check if our blueprint is actually working. To check that open your terminal and run this command python app.py, then go to http://localhost/index/ in your browser and see that This is flask blueprint example is printed. We have successfully used Flask Blueprint in our project and we have structured our project in different python modules using the Blueprint. When the project will grow bigger and bigger that time we can adopt the following project structure to keep it more maintainable. project_root/ — app.py — app_module/ — __init__.py — views.py Copy The complete code of this article can be found at this repository.
Terraform Terraform is an open-source infrastructure as a code software tool. It allows building, changing, and versioning the infrastructure. Terraform uses a declarative approach to define the infrastructure. Users will define the end infrastructure that they want and terraform will do the rest of the thing to have that infrastructure. Terraform allows its users to define and describe the infrastructure using a declarative configuration language known as HCL or HashiCorp Configuration Language. When the end infrastructure is defined terraform will do the plan and then executes this plan to provision that infrastructure. Terraform supports all the public clouds like Amazon Web Services, Microsoft Azure, Google Cloud Platform aw well as private clouds such as VMWare vSphere, CloudStack, or OpenStack. In this article, we will define an infrastructure for the AWS provider which will have an AWS Lambda and AWS Step Functions working together. AWS Lambda AWS Lambda is a Function-as-a-Service platform by Amazon Web Services. It can run code without provisioning the servers. This allows the developers to focus only on code as AWS Lambda is taking care of everything else. There are three core components of AWS Lambda. The handler function is the main function that will be run when lambda executes. Event Object is the first argument passed to the function when it gets executed. It contains information about the event invoking the lambda. And the Context Object contains lambda runtime information. So let’s define our handler function for the lambda. For that create a folder lambda and inside that folder create a file handler.py. The code for the handler function will be as below. Copy import loggingLOGGER = logging.getLogger() LOGGER.setLevel(logging.INFO) def handler(event, context): LOGGER.info(f'Event Object: {event}') LOGGER.info(f'Context Object: {context}') event['key'] = 'value' return event import loggingLOGGER = logging.getLogger() LOGGER.setLevel(logging.INFO) def handler(event, context): LOGGER.info(f'Event Object: {event}') LOGGER.info(f'Context Object: {context}') event['key'] = 'value' return event This is a super simple function. In the function, we are logging the event object and context object and set value as the value of the key key in the event object. Finally, we are returning the updated event object. Now let’s write some terraform code for this lambda function. For that create a folder terraform and inside that folder create a filelambda.tf. The content of this file will be as follows. Copy // Lambda function resource "aws_lambda_function" "lambda_function" { function_name = var.lambda_function_name filename = data.archive_file.lambda_zip_file.output_path source_code_hash = data.archive_file.lambda_zip_file.output_base64sha256 handler = "handler.handler" role = aws_iam_role.lambda_assume_role.arn runtime = "python3.8" lifecycle { create_before_destroy = true } } // Zip of lambda handler data "archive_file" "lambda_zip_file" { output_path = "${path.module}/lambda_zip/lambda.zip" source_dir = "${path.module}/../lambda" excludes = ["__init__.py", "*.pyc"] type = "zip" } // Lambda IAM assume role resource "aws_iam_role" "lambda_assume_role" { name = "${var.lambda_function_name}-assume-role" assume_role_policy = data.aws_iam_policy_document.lambda_assume_role_policy_document.json lifecycle { create_before_destroy = true } } // IAM policy document for lambda assume role data "aws_iam_policy_document" "lambda_assume_role_policy_document" { version = "2012-10-17" statement { sid = "LambdaAssumeRole" effect = "Allow" actions = ["sts:AssumeRole"] principals { identifiers = ["lambda.amazonaws.com"] type = "Service" } } } // Lambda function resource "aws_lambda_function" "lambda_function" { function_name = var.lambda_function_name filename = data.archive_file.lambda_zip_file.output_path source_code_hash = data.archive_file.lambda_zip_file.output_base64sha256 handler = "handler.handler" role = aws_iam_role.lambda_assume_role.arn runtime = "python3.8" lifecycle { create_before_destroy = true } } // Zip of lambda handler data "archive_file" "lambda_zip_file" { output_path = "${path.module}/lambda_zip/lambda.zip" source_dir = "${path.module}/../lambda" excludes = ["__init__.py", "*.pyc"] type = "zip" } // Lambda IAM assume role resource "aws_iam_role" "lambda_assume_role" { name = "${var.lambda_function_name}-assume-role" assume_role_policy = data.aws_iam_policy_document.lambda_assume_role_policy_document.json lifecycle { create_before_destroy = true } } // IAM policy document for lambda assume role data "aws_iam_policy_document" "lambda_assume_role_policy_document" { version = "2012-10-17" statement { sid = "LambdaAssumeRole" effect = "Allow" actions = ["sts:AssumeRole"] principals { identifiers = ["lambda.amazonaws.com"] type = "Service" } } } Here we are creating two resources aws_lambda_function and aws_iam_role. The lambda function that we defined earlier is being zipped in archive_file and it is also being referred to in aws_lambda_function resource. We are creating aws_iam_role resources as lambda requires it to run the function. The policy document of this resource is defined in aws_iam_policy_document the data object. One important thing to note here is that we are taking the name of the lambda function from var.lambda_function_name. Terraform allows us to define some variables and use them in the terraform files. So let’s create a file vars.tf that will contain all of our variables. For now, it contains only the following. Copy variable "lambda_function_name" { description = "The name of the lambda function." type = string default = "test_lambda" } And at this point, the directory structure will be as below. . +-- lambda | +-- handler.py +-- terraform | +-- lambda.tf | +-- vars.tf variable "lambda_function_name" { description = "The name of the lambda function." type = string default = "test_lambda" } And at this point, the directory structure will be as below. . +-- lambda | +-- handler.py +-- terraform | +-- lambda.tf | +-- vars.tf AWS Step Functions AWS Step Functions is the orchestration of serverless microservice architecture. It divides a complex business workflow into smaller steps and implements them in AWS Lambda or other AWS services. The main building blocks of AWS Step Functions are the states. There are several types of state like Task, Pass, Choice, Wait, Parallel, Map, Fail, and Succeed. The states are defined in AWS States Language which is a JSON-based specification language. AWS Step Functions execute the states according to the order in which they are defined and retry them if any error or exception occurs. Now that we know what AWS Step Functions actually is, it’s time to define a step function in Terraform which will invoke the lambda that we have defined earlier. For that create a file step_function.tf inside the terraform folder and put the below code in that file. Copy resource "aws_sfn_state_machine" "sfn_state_machine" { name = var.step_function_name role_arn = aws_iam_role.step_function_role.arn definition = <
SQLAlchemy is a very powerful and easy to use ORM written in Python. It really helps to develop applications faster. This blog post is about how we can use Unit of Work pattern when using SQLAlchemy ORM (an ORM written in Python for Relational Databases). This blog post assumes that you are already familiar with SQLAlchemy, know how to setup and connect to database and know how to play with basic operations using SQLAlchemy. Traditional Way to Do a Business Transaction When a business transaction involves several database operations, traditionally what you do is you perform each operation separately inside a transaction block. This can lead to lots of very small database calls, which ends up being very slow. Moreover it requires you to have a transaction open for the whole interaction, which is impractical if a business transaction needs multiple requests to be completed. This is a problem in traditional way of performing a business transaction. The Unit of Work design pattern helps to solve these kind of situations. What is Unit of Work Pattern and How It Works A Unit of work is a design pattern which is basically used in performing database transactions. “A Unit of Work is used to maintain a list of objects affected by a business transaction and to coordinate the writing out of these changes.” — Martin Fowler A Unit of Work keeps track of everything you do during a business transaction that can affect the database. When you’re done, it figures out everything that needs to be done to alter the database as a result of your work [2]. Unit of Work design pattern does two important things [3]: It maintains lists of business objects in-memory which have been changed (inserted, updated, or deleted) during a transaction. It then sends these in-memory updates as one big unit of work (transaction) to the database. Still confusing? Lets illustrate this with an example. The Problem Suppose, you have an e-commerce application, where your users can order products by using your application. When a user creates an order, this order can contain several items of different quantity. You need to save the order along with the items and the quantity into the database. Suppose the Database models are as follows: Note: The models bellow are PostgreSQL compatible only. You can use any other Relational Databases supported by SQLAlchemy and change the models accordingly. models.py: you can check the bellow code here too. And, the incoming data having the order details is of the following structure. You can check the following code here too. Solution 1: Using the Traditional Way operations.py: you can check the following code here too. In the above order creation operation, session.commit() will be called 3 times to complete the transaction, i.e., it’s calling database 3 times. So, what if the payload you are saving is much bigger? This will use more number of database call. Let’s try to get the same effect in database using Unit of Work. Solution 2: using Unit of Work Pattern operations.py: you can check the following code here too. Here, notice that session.commit() is called only once. All the other operations (in this case, the insert) were done in-memory and then sent to database as a big unit of work. SQLAlchemy will handle the rest of the thing using Unit of Work pattern. This way is much more efficient than the traditional one. It doesn’t require you to save each object separately, thus helps to prevent the transaction being slow. You just need to manipulate the objects in-memory and then send the whole unit of objects at a time, SQLAlchemy will handle the rest of the thing on your behalf. This pattern can be applied in the case of update and delete operations too. In those cases, you’ll update and/or delete multiple objects in-memory and finally apply session.commit() to reflect the changes in database. Happy Coding !!! References SQLAlchemy: Session / Unit of Work Unit of Work by Martin Fowler Unit of Work Design Pattern SQLAlchemy ORM Tutorial for Python Developer
Effectively manage the change of field data type of PynamoDB, an object-relational mapper (ORM) for DynamoDB. Ensure smooth database schema updates and maintain application performance and integrity with this guide. PynamoDB, with a Python interface, is a great ORM for AWS DynamoDB. DynamoDB is a NoSQL database with scalability and security and it has awesome API and SDKs. PynamoDB wraps the underneath APIs of DynamoDB and gives a beautiful pythonic way to use DynamoDB. In real-world our DB fields are not constant. It can change with the requirements update of our project. The hard part is when you have to maintain the old and new features. For example, a field data type can change from String to Binary. So if any API e.g. REST API with versioning is working with DynamoDB, you have to accept both old data type (String) and new data type (Binary). We are going to find a solution in such a case. Setting the goal Let’s start with setting a goal. Assume we have a field with Dynamo data type List. But after times it changes to Map. So we will do Accept Map object and save to DynamoDB Accept List object and change it to Map according to requirement and save to DynamoDB as our field changed to Map Return Map object according to requirement change Setting the project Let’s add a couple of files to do our task. # Add project folder mkdir change-field-ddb cd change-field-ddb # Add Pipfile for requirements mange with pipenv touch Pipfile # For Custom PynamoDB attributes touch attributes.py # Add models.py to add pynamo model touch models.py # To test everything touch test.py Add python requirements Add following requirements to Pipfile [dev-packages] pipenv = "==2020.8.13" moto = "==1.3.14" [packages] pynamodb = "==4.3.2" [requires] python_version = "3.8" Now initiate pipenv with pipenv install Now the project will look like tree . ├── attributes.py ├── models.py ├── Pipfile ├── Pipfile.lock └── test.py The changed datatype Let’s assume our previous datatype (List) for a field result is [3.75, 3.17, 3.90, 3.67, .......] So the result stores CGPA of a student from 1st semester to final semester e.g. result[0] as 1st semester, result[1] as 2nd semester, and so on. But we will make it better (Map) at the updated version { 'semester 1': 3.75, 'semester 2': 3.17, 'semester 3': 3.90, 'semester 4': 3.67, .................. } PynamoDB attributes Add the custom PynamoDB attribute to accept old (List) and new (Map) attribute and saves only as Map. But at return time it will return old (List) data as Map and also new data as Map. Also, we are going to use custom UUIDAttribute which will be used as a hash key. The PynamoDB Model We are going to start with a simple PynamoDB Model only with 2 fields Time to Test Add some tests in test.py Run tests with pipenv shell python3 test.py Full code can be found here: https://github.com/melon-ruet/change-field-ddb
Mahabubur Rahaman MelonRead →
Looking for A Trusted AI-native Partner?
Our engineers work inside your product team, bringing broadcast experience and AI-native workflows. Let’s talk about your platform, your roadmap and where you need support.